by John Krout, Member, Potomac Area Technology and Computer Society, VA
www.patacs.org
jkrout75 (at) yahoo.com
This article describes the use of a feature of Audacity, the popular digital audio editor application, called noise reduction.
Noise is audible all around us. When we make an audio recording, usually some noise is included. I dictate memos to my tablet audio recording application while in my car or hiking in the woods. Outdoors, wind is almost always a part of the background noise, and in the car there is engine noise, HVAC fan noise, and sometimes surrounding traffic noise included. Your ears might not notice noise, but that is a part of human audio perception: we filter out the noise and pay attention to other, possibly more important sounds. It goes all the way back to the ancient time when the more important sounds might, to paraphrase a famous rock musician, potentially become our lunch or might try to make lunch out of us.
If you do not believe your live recording includes noise, then listen to it using earmuff-type headphones that exclude the sounds around you. Listen especially to the quiet parts.
Personal computer applications have been available to reduce noise in audio recordings for quite some time, 20 years or more. The Adobe application called Audition, a competitor for Audacity, includes a variety of noise reduction capabilities. BIAS Corporation, until it went bankrupt, offered an application called SoundSoap that did only audio noise reduction, and nothing else. I used SoundSoap in the 2000s for audio noise reduction on self-produced DVDs of high school music concerts and plays produced by The Children’s Theater in Arlington VA.
There are a couple of key concepts when using any audio noise reduction application.
First of all, noise reduction applications require you to identify in your audio recording file a segment of at least four or five seconds during which the noise and only the noise is heard. Sometimes the noise-only portion is at the beginning of the audio recording, but it could be anywhere in the audio recording. What the noise reduction applications do is analyze that noise segment so that the same noise can be subtracted from the overall recording.
What I suggest you do when making any live audio recording is tap the Start button at least five seconds before the first spoken words or sounds occur. That leader portion becomes your noise sample for noise reduction.
Second, often the noise reduction is especially useful where the audio you want to use is recorded at a relatively low level. With modern entry-level recording apps lacking Automatic Gain Control (AGC), this can happen when the audio source is distant from your microphone. I ran into two examples recently, both involving animals. Typically, then, to make the sound recording louder, and therefore useful as a ringtone, we use an application like Audacity to increase the audio level of the recording.
When you combine the two, amplification and noise reduction, it makes the most sense to amplify your entire recording first, then select the audio noise segment, and do the noise reduction on the entire audio recording.
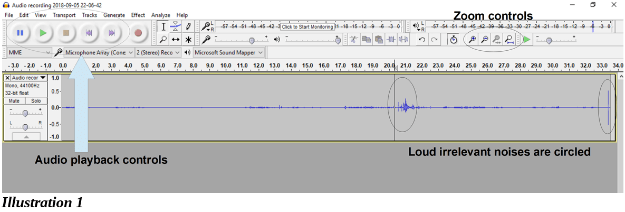
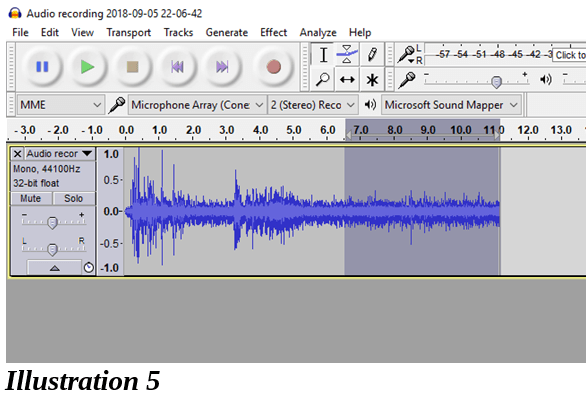
Illustration 1 accompanying this article is a screen capture of Audacity displaying a short recording that I made in Yosemite National Park on the evening of September 5, 2018. This is a recording of a howling animal. I had heard howling on the hillside to the north of the Old Faithful Village for four straight nights and, on September 5, I was outside with my smart phone at the time the howling started up, so I made a recording.
The next day I played the audio recording for a National Park Service Ranger, and she said the animal was a coyote.
In Audacity, the recording graph is very low level, quite minimal, because the coyote was far away from my smart phone. I had no desire to get any closer, stumbling through unfamiliar terrain at night, and I would have scared the animal into running away. Below you will learn how I improved the recording and ultimately made a ringtone. An important part of the process is amplification.
CLIPPING: THE UPPER LIMIT OF AMPLIFICATION
To understand amplification and its limits, you need to learn a recording concept called clipping. This concept is a part not just of digital recordings but also of all analog tape recorders, plastic records, stereo amps, and every guitar amp ever made, so it is a very old concept. All of these devices have limits of how loud they can record or reproduce sound. Amps often are rated based on wattage. A small amp might use 25 watts, and a big one might use 200 watts. Essentially that wattage rating defines the level at which clipping is done.
When using any audio editor app, the editor displays the recording just like it would look on an oscilloscope, with ups and downs. The loudest portions have peaks that stand out, looking bigger in both the up and down direction.
Audacity and similar apps have a limit on loudness, just like the analog media. In recording devices, the limit is usually called zero decibels, or decibels abbreviated as dB. When a peak literally exceeds that limit, its top is clipped off at the limit. And that effect radically changes the sound. Sounds at lower levels are expressed as negative decibels, because zero dB is the loudest.
In fact, clipping is how guitarists introduce fuzzy distortion of a guitar sound. Please refer to the Illustration 2. This is a photo of an oscilloscope on which a clipped sine wave is depicted. I borrowed this from a Wikipedia article on audio clipping. You might remember the smooth curves of a sine function from high school trigonometry. In this example, the peaks have been clipped and are replaced with flat areas.
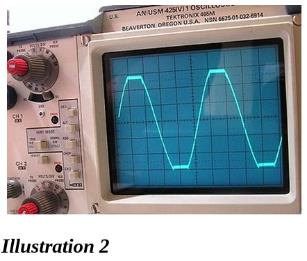
To put it diplomatically, clipping is bad news when you want your amplified audio recording to sound just like you heard it. In short, you want to avoid clipping.
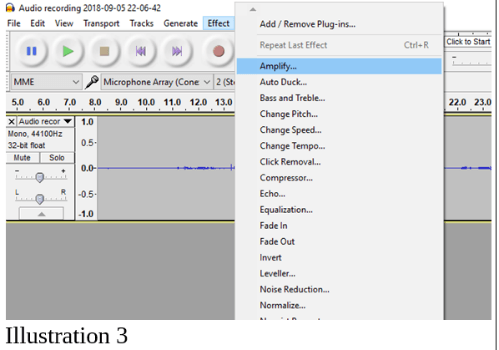
Audacity has a convenient amplification tool. It is found in the Audacity Tools menu. The menu choice is Amplify… as shown in Illustration 3. When you select that choice, it will suggest the amplification amount, in decibels. This suggestion is based on Audacity’s analysis of the loudest peaks in the audio recording; it will amplify the recording so that the loudest peaks just barely reach -1 dB, precisely so that no peak is clipped.
The dialog box allows you to override that goal and amplify even more, but I strongly recommend not going beyond zero DB. Just beyond that level, clipping happens, and I strongly urge you to avoid doing so.
Although I am an advocate of using good quality microphones, for the same reasons that good lenses are a must on cameras, I did not have good microphones with me, plus the animal probably would have quit sounding off and departed before I hooked up microphones. I used the smart phone’s built-in microphone.
I decided that the coyote sounds would make good ringtones. Ringtones have two important characteristics: they must be short, ideally less than say 5 seconds, and they must be loud. So I wanted to amplify the audio recordings, and remove the audio noise, and choose one good short sound occurrence of the animal sound, the yip-yip-howl pattern.
I also did that for a recording I made while on vacation in West Virginia during the first week of August. One night at about 11 pm, outside of our rental home, we heard an owl hooting away, conversing with a more distant owl. I think the closer owl was maybe 50 or so feet from our door, but I never did see the animal in the trees. That time, too, I made a recording of the animal using my smart phone. I used Audacity to turn that recording into a ringtone I call Two Hoots.
All of these audio recording modifications are easily done using Audacity.
REMOVE LOUD IRRELEVANT SOUNDS
Now, what happens if the loudest sound in your audio recording is irrelevant? Maybe a door slammed, or a car drove by, or a jet flew overhead. As a practical matter, if that loud irrelevant sound is included, then the Amplify… feature will suggest an amplification factor that avoids clipping the loudest sound but, at the same time, does not adequately amplify the sound segments you care about.
To work around that limit on amplification due to those loud irrelevant sounds, you have some choices. All of them start with you selecting the loud and irrelevant sound. Listen to the audio recording of that loud and irrelevant sound using Audacity playback.
As depicted in Illustration 1, the Audacity playback control buttons appear in the upper left of the Audacity window, and look like CD player controls, including pause, start and stop buttons.
While you listen, Audacity not only moves its cursor through the recording graph, but also displays the timepoint measured in seconds from the start of the audio recording. You can identify the playback timepoint when the irrelevant sound occurs, then stop playback and select the irrelevant sound.
To determine the precise start and end of the irrelevant sound, you can magnify the graph display. The buttons for magnification are on the upper right of the Audacity window.
See Illustration 1 in which the Audacity playback control buttons and the magnify buttons are shown. The magnification buttons, from left to right, are: + (zoom in), – (zoom out), zoom to selection, and zoom out to show the entire recording.
In the coyote recording, I found two places where irrelevant loud sounds were recorded. One was at the very end; it is a loud snap, and I am not sure what made that sound. The other was in mid-recording, and was not quite so loud, some conversation in the background as park visitors were returning from dinner at the Old Faithful Lodge. These two irrelevant sections are also circled and pointed out in Illustration 1.
The Audacity selection method for audio is a lot like selecting a paragraph in a word processor. Click at the beginning of the audio segment, hold the mouse button down, and drag to the end of the audio segment. Then, at the end of the segment, you can let go of the mouse button. Magnification lets you play back, identify and select the irrelevant loud sounds very precisely.
The three methods of eliminating the effect of a selected irrelevant audio recording segment are:
- Delete the unwanted sound (like deleting a paragraph out of a Word doc)
- Blank the unwanted sound (replace it with zero sound)
- Reduce audio level of the unwanted sound (the opposite of increasing the audio level)
- Deleting is perhaps the easiest. After selecting the unwanted sound precisely, tap the Delete key on your keyboard. Voila! The loud sound disappears.
I do not recommend either of the latter two methods. Blanking will possibly disrupt noise reduction. Reducing audio level requires you to know the audio level in the remainder of your recording; you need to reduce the level in the loud irrelevant segment so that it is no louder than the relevant portions.
THE AMPLIFY TASK
After eliminating the loud irrelevant loud sound, you can amplify the entire audio file. Choose the Amplify… feature in the Effect menu. Illustration 3 shows that menu and the Amplify choice is highlighted.
When you choose Amplify, Audacity automatically selects your entire recording, analyzes it, and presents a dialog box in which it suggests the amplification factor, in decibels, that is sufficient to maximize the peaks of your audio recording. As I recommended above, simply click on OK to accept the recommended amplification level.
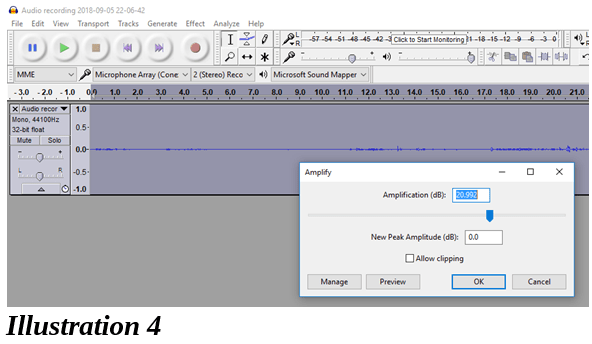
Illustration 4 shows the dialog box with the amplification factor suggested by Audacity for my coyote recording after I deleted the two irrelevant loud segments. The new decibel level is shown as zero dB, which is the maximum possible level without clipping.
After listening to my coyote recording a few times, I decided the best coyote sounds were in the first 6 seconds, and the best sample of noise alone was in seconds 6.5 to 11. I deleted the remainder of the audio recording beyond second 11.
The noise in the coyote recording included the Firehole River nearby (I thought the coyote was on the other side of the river), the wind in the trees, and possibly the background noises of the Old Faithful Village complex at night.
THE NOISE REDUCTION TASK
- It is time to apply noise reduction. In Audacity, noise reduction is a two-part process.
- Step 1 requires you to identify a noise-only segment of the audio recording. Audacity analyzes the noise and remembers how to subtract it from the entire audio recording.
- Step 2 does the work of subtracting the noise from the entire audio recording.
Noise reduction is one area where Audacity could use a bit of user interface improvement to avoid some ambiguity. Here, in a nutshell, is how to use it.
- Select the noise-only segment of your audio recording.
- In the case of the coyote audio recording, that starts at second 6.5 and ends at second 11.
- That selection is shown in Illustration 5.
- Remember, this is after amplification, so that the sound graph appears much bigger than before.
After selecting the noise-only segment, in the Audacity Effect menu, choose Noise reduction. Illustration 6 shows the Audacity Effect menu with the Noise reduction choice highlighted.
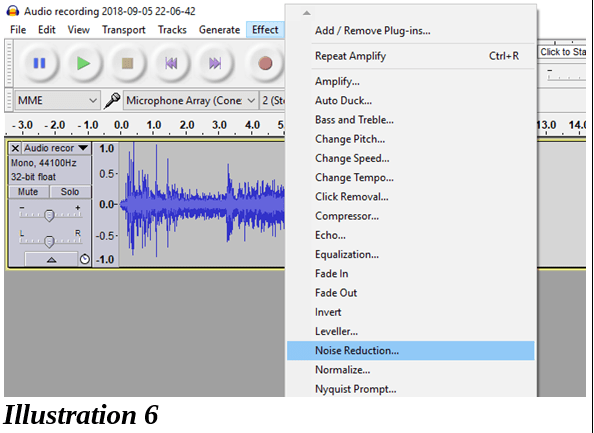
Illustration 7 shows the Noise reduction dialog box which appears when you choose Noise Reduction in the Effect menu.
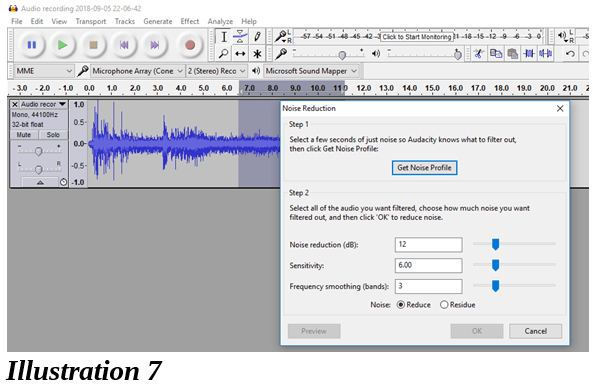
The dialog box had two parts, labeled Step 1 and Step 2. Notice that initially the OK button at the bottom of Step 2 in the dialog box is inactive, grayed out.
- To complete Step 1, click on the button labeled Get Noise Profile.
- When you click that button, Audacity analyzes the selected noise-only segment. Then Audacity closes the Noise Reduction dialog box.
- Your next task is to select the entire audio recording. In Windows you can do that by tapping the CTRL-A key combination.
- To complete Step 2, use the Effect menu to re-select Noise Reduction. The noise reduction dialog box re-appears.
- This time in the dialog box, the OK button is active, because you have already completed Step 1 and Audacity remembers the noise profile it created in Step 1.
- All you have to do is tap the OK button.
There are some noise reduction parameters you can adjust in Step 2 of the dialog box. I have not tried that so I cannot give you any advice about that.
EXPORT AND CONTINUE EDITING
At this point, with noise reduction completed, I strongly suggest exporting the recording under a new name, maybe by adding the suffix noise free.
Why not Save? In Audacity, Save is for storing a Project, a combination of the name of the open audio recording file and a description of effects applied to the file. Save does not save the edited audio file itself. Export does that.
After exporting, you can edit the file to delete the noise-only segment, so that you have only the precise audio segment that you want.
I applied one more Effect menu item, called Fade Out, for the last quarter second or so of the recording.
I displayed the Audacity File menu and selected Export Audio. Then I exported the six second ringtone as an M4A file, and again as an MP3 file. The MP3 file is now ready to use as an Android ringtone. I changed the M4A file suffix to M4R, so iPhones will recognize the file as a ringtone file.
If you have not done sound exports previously to M4A or MP3 with Audacity, it will first prompt you to download and install third-party libraries for file types MP3 and M4A.
I applied Audacity amplification three times overall to the Coyote recording, for a total of more than 32 decibels. That is a very substantial amount of amplification. I think the ringtone sounds pretty good.
Enjoy!
About the author:
John Krout is a former president of the Washington Area Computer User Group, a predecessor of PATACS. He is a frequent contributor to the PATACS Posts newsletter and occasionally demonstrates various interesting tech at PATACS meetings. He began working with audio recording tech in high school, worked as a DJ and news reader in college radio and television, and began working with personal computer digital audio in the 1980s. In July 2018 at a joint meeting of PATACS and OLLI OPCUG in Fairfax City VA, he demonstrated ways to use personal computers to create do-it-yourself ringtones. A software developer for major multi-server computer systems for many years, he is now a tech writer for a major maker of automated fingerprint identification hardware, supporting a federal agency’s system in which that hardware plays a major role.
[print-me]